
It’s finally done! The dullcote saved the rough spot that looked so not good in gloss and things really came together. It’s a joy to pull off that masking at the end that’s been on so long and see that the pilot is in there and things stayed where they should.
Also great fun to add those last breakable bits I left off during painting like pitot tubes and antennae. I really like the super tiny radio antenna I added from very thin nylon thread.
What a fun build that was full of learning new things!


About a week ago, I put a full shine of Testors glosscote on. It was no easy task with the dunkelbraun the way it was. I should have sanded that down a bit more. But my hope now is when I make the finish flat again with Testors dullcote, that the roughness so apparent in gloss will seem nothing. Fingers crossed.

You can see the roughness when this glosscote is on over the brown area. Hoping that goes away.

Much smoother here, should take decals well.

There’s going to be a decent amount of detailing and weathering on this underside that I’m counting on the glosscote for.
I’m going to be detailing the underside with a black acrylic wash using a technique I read about online. Let the wash flood into panel lines and detail areas, then come back with a clean brush mostly rung out of water, and sop up the extra. This leaves dark detail in the deeper spaces and makes it simple to control how much is left. It’s not fast, but it’s controlled.
Example of the detailing on the tail. The left image shows a decaled and reglossed tail witbout the detail added from the wash yet. The right side shows that detail applied to the reverse side. It’s not much in some lighter panel lines, but it’s enough to really make it pop.


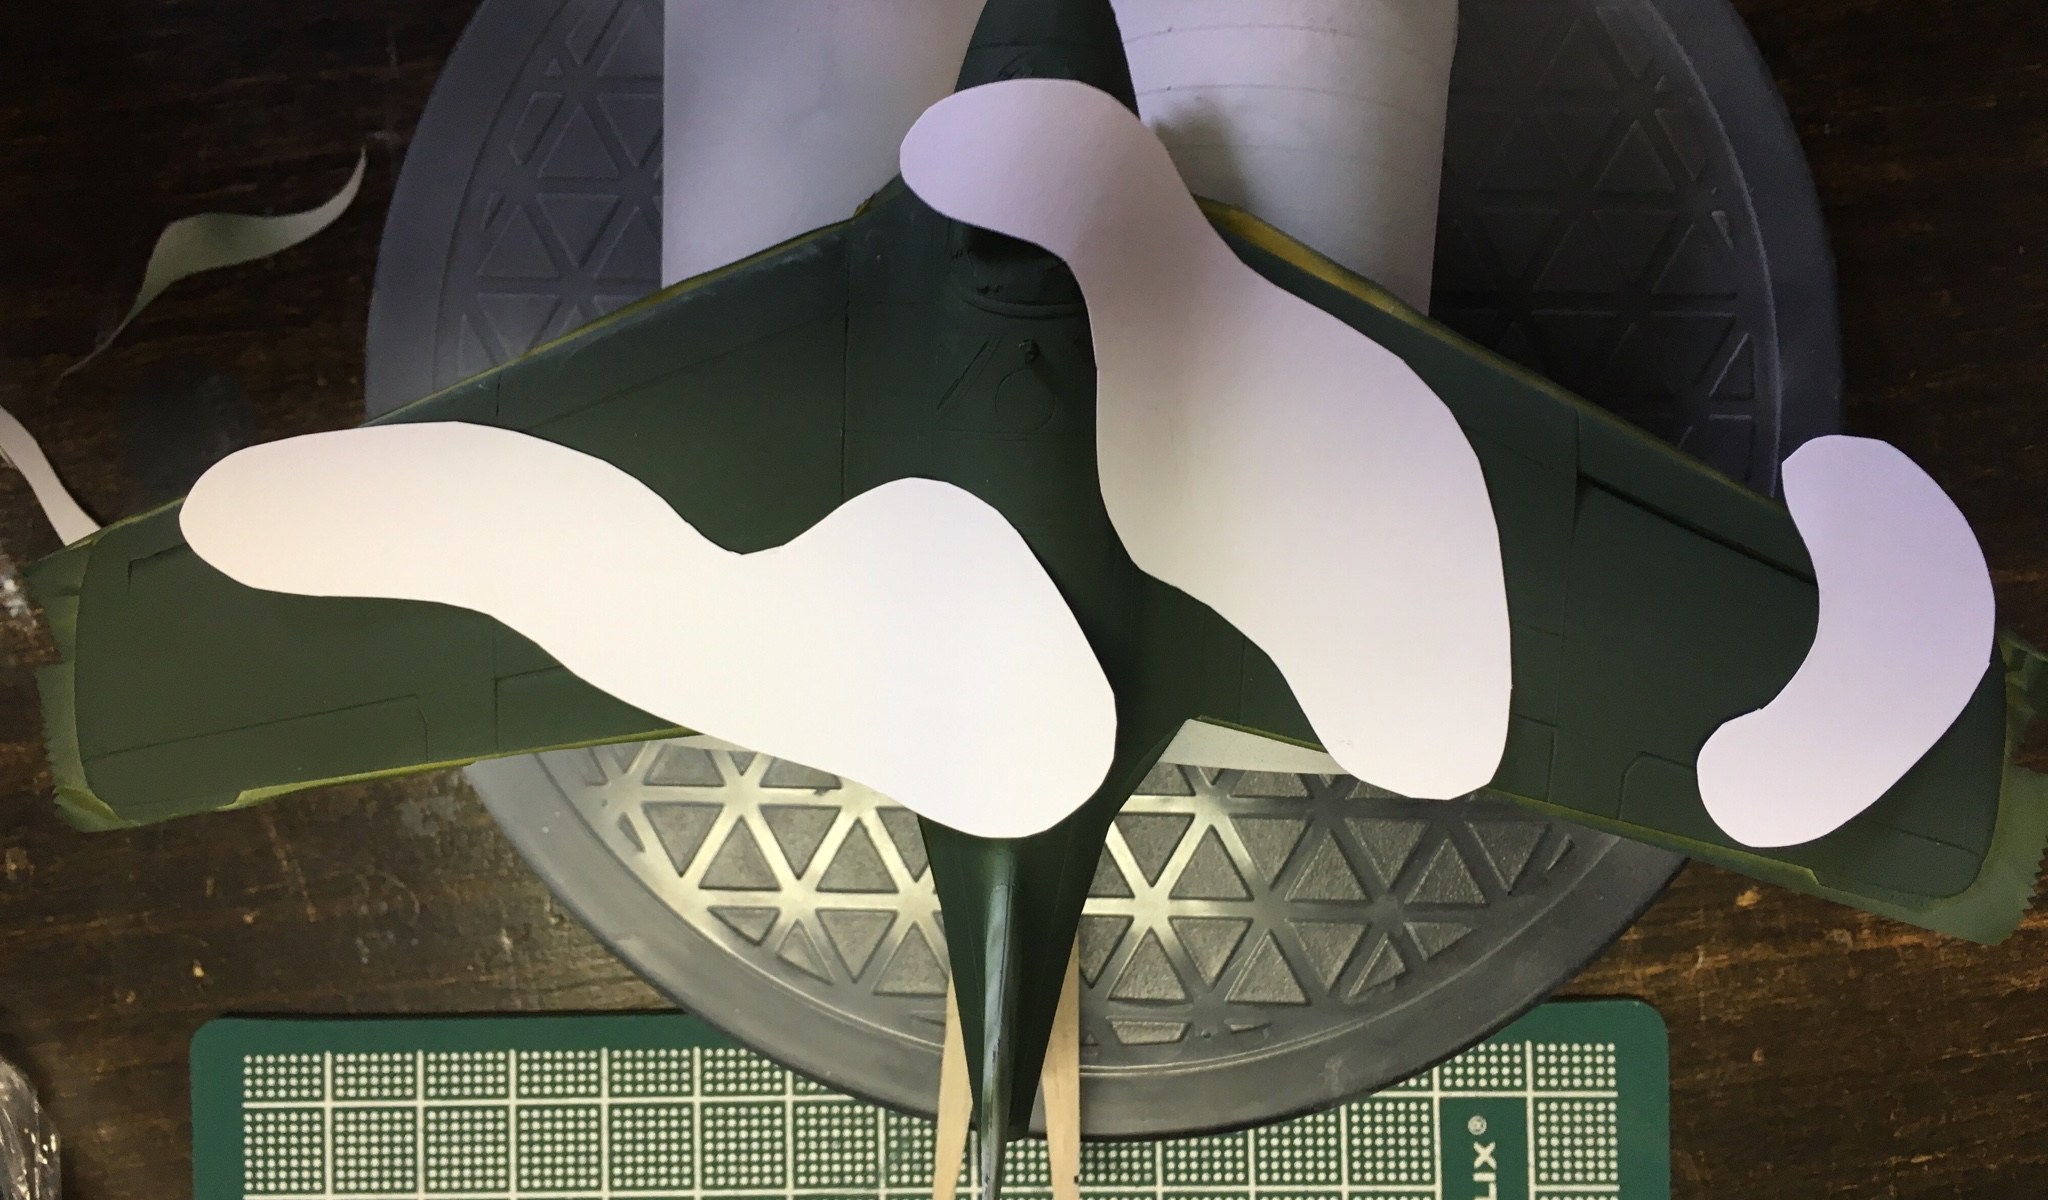
I was pretty sure I planned this well, thought through the drying time needed, etc. But as my first masked camo, I didn’t think my way through the masking for the second color well.

After that, I decided to just try to use the inverse mask I’d cut these from. That’s what I decided to go with.


I think the result was decent. There is a very rough surface on the dunkelbraun. I think it’s either mixing a really old paint with new or a gloss with a flat. Not sure. Not sure the consequenses either. I think I can gently sand it smoother if needed, even just rubbing with a cloth.


I let it fully set and took the mask off the next day. I think it’s coming together!


I’ve masked the white/blue bottom and now can focus on the dunkelgrun base that will hold up against the dunkelbraun.
Now’s the first time I really get to do a little careful painting with my airbrush for the dunkelgrun against the white/blue/grey on the tail. This is one of the things I’ve dreamed of being able to do with an airbrush! It’s fun and a little scary after this work, but I know I can redo it if needed.


Time for the white underside. The Testors recommended mix for this under color is essentially white with a touch of blue. Corresponding colors from Testor are mixed next to make the dunkelgrun and dunkelbraun respectively next to it.
I’m freely painting this first with no mask needed because it’s only when I paint the camo for the top with the dunklegrun and duklebraun that I’ll need to be sure to mask carefully.


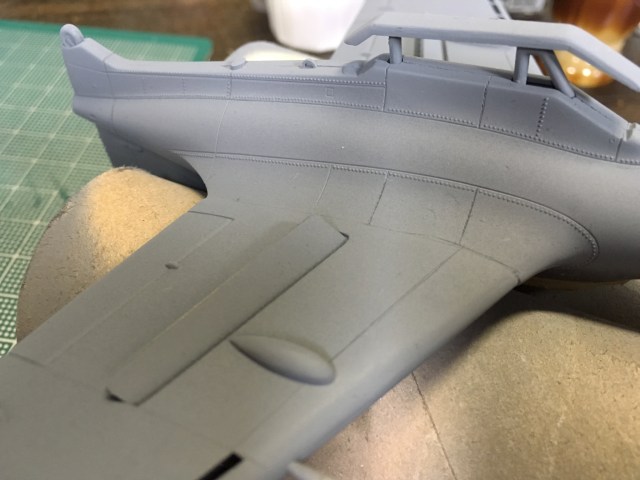
Let’s hope the fill, sand, scribe, polish train is over. It’s time to prime! After airbrushing on some Testors enamel primer, here’s how things checked out:


I think it came out pretty decent! I don’t see places I feel like going any farther to make cleaner or better. At a certain point, ‘perfect’ becomes the enemy of ‘good,’ and as this is about having fun, it’s time to have some more fun!

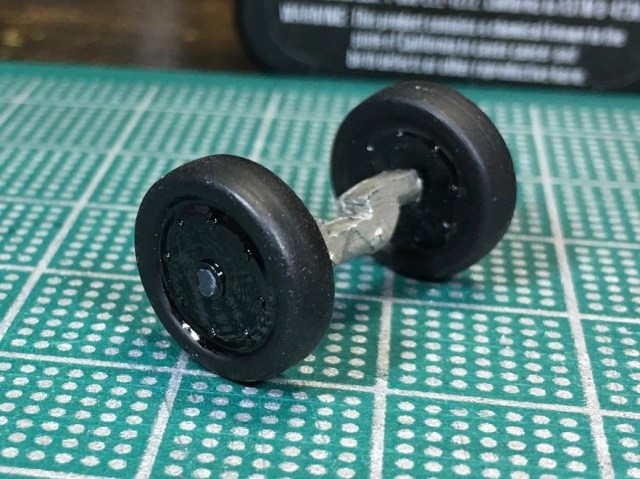
Ever feel like you’ve just had it too good? Me either, but for some reason, testing new tools? Over confidence? I felt like I needed to break part of this model purposely and repair it solidly. I think I’m paying too much attention to how cheap this was. Might be an idiot too.
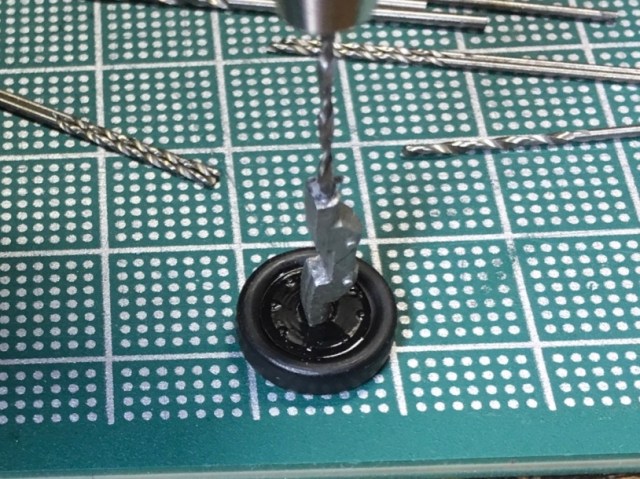
I’d assembled the dolly wheels for the jet when I was suddenly taken with the stupid notion that I could do no wrong and had all remedies for any calamity. You know there’s something dumb about to happen when you feel like that.
So I broke the wheel off one side of the dolly.
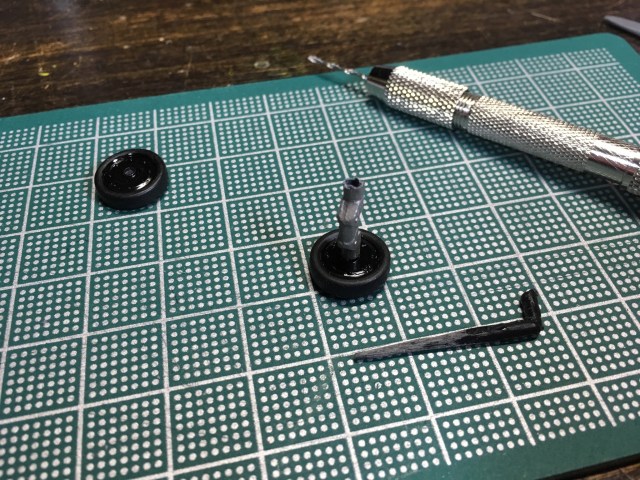
I went to my new trusty pin vise and bits and also started making a replacement part from the sprue for the bit I’d broken off.

Having shaped the sprue into something I could start with, I matched a bit to it and then drilled out the broken axle from the wheel I’d broken off.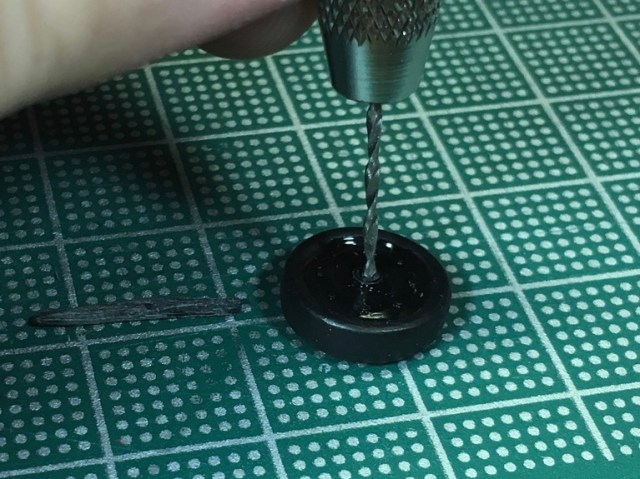
After that, I used the same bit to open up the dolly axle where I’d broken off the wheel.

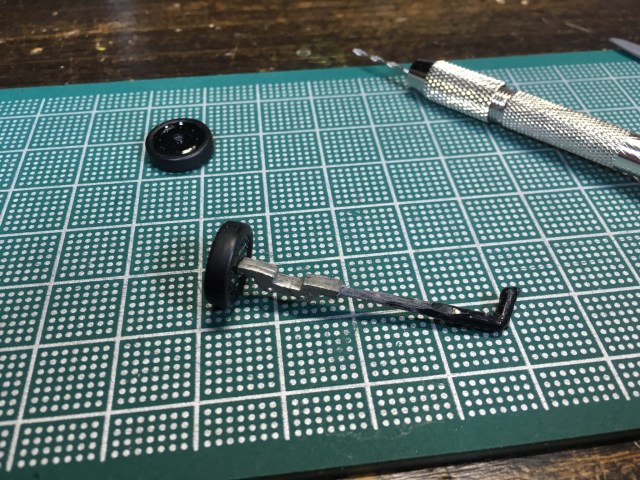
Having prepped that, I now had the bits I needed with good fit to fix the broken dolly. I test fitted those and then cut the pieces to fit.
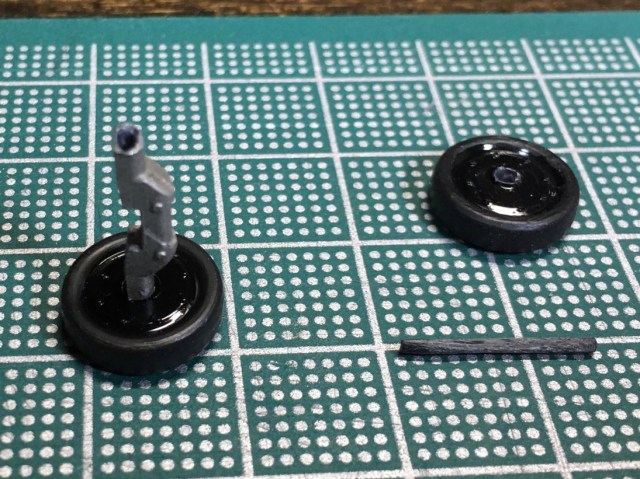
And there you have it. A fixed dolly I broke on purpose, to see if I could fix it. It was … good practice? A confidence builder? I guess it’s a good feeling knowing I can fix what’s broken or find a way, but I’m not sure in retrospect this was necessary. It made sense at the time is the best I can say.
It seems like all I do is sand and fill lately. Part of me thinks this is a hilarious amount of time to spend on $2.50 worth of plastic. Part of me feels like I’m learning some new ways to do things I’ve not done before. Part of me feels like this model will be pretty decent when it’s done. Part of me feels like it’s never going to end.
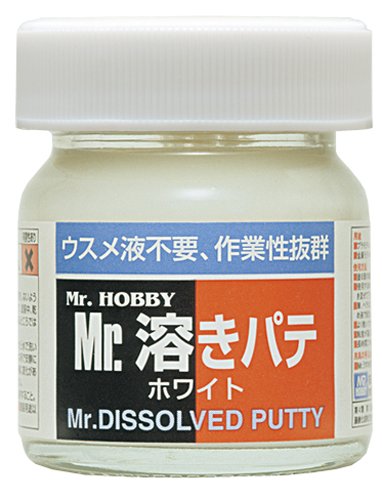
I did a fair amount of that fill, sand, scribe, polish, drill, and fill again. I’ve been using mostly Mr. Dissolved Putty to do this work, but have tested things like some different super glues and zap a gap kind of stuff. I can honestly say, I don’t have the hang of it.
My understanding is that super glue fillers are supposed to partially set and then be sanded before fully set or you’ll sand off the softer plastic instead of the harder, fully-set super glue. Mission accomplished. I’ve managed to do that several times and been more unhappy when the partial super glue is sanded. Just seems to smear everywhere. Clearly not my thing.
Mr. Hobby Mr. Dissolved Putty is my thing and way better than old Testors putty. It’s been thinned with something like model glue and tends to spread into cracks and surfaces more than it doesn’t. It dries fairly quickly (20 minutes), and is ready to sand at a softer / faster rate than the surrounding plastic. It’s the one that’s reliably working for me. I’ll trade speed for control gladly.
That said, I feel like I’m just about there and ready to test with a primer coat soon to see how it’s actually going. Very hard to see exactly how well things are filling with a dark plastic and white putty filler.


So it begins. I’m new to this sanding and finishing. I’ve read about all kinds of ways people do this, all the way to the extremes of wet-sanding. I’m not sure I’m ready to go that far or if I ever will be. Suffice it to say, I’ve spent most of my time today doing nothing but filling, sanding, finishing, repeating. I’m able to get a decent fill and finish only to find there’s something I have lost in the process and need to rescribe, only to find in doing so I lost another detail or didn’t fill as well as I hoped, etc.
I haven’t done the very best on my rescribes that I’d like it to be, but I’ve been able to fix my mistakes. The proof will be in the primer coat to see how it all has ended up, smoothed out.
One thing’s for sure: I’m not done filling, sanding, finishing for a while yet.


P.S., the toothpick is filing a hole I want left clean unpainted so I can glue a part in later.

Now that I have an airbrush for the first time, I can really work on the fit and finish of my exteriors. I think this is going to be a great opportunity to really push that on such a small aircraft that I can put lots of time into the exterior on.
 I’m also excited as part of that to really do a good job making the canopy look like it’s fully sealed to the aircraft. Something past models didn’t do in appearance or actuality in most cases. Got this baby taped up well with Tamiya tape, which I highly recommend to anyone who’s not used it before. If you were used to almost anything else (in my past I used everything from scotch, to masking, to electrical tape), you’ll be super pleased.
 I also got my paint mixed per the Testors recipe from the kit. Knowing it’s their mix and their paints, I’m thinking it’s fairly accurate. They look good to me anyway. 🙂 The real test will be do I have them thinned properly. As a newbie to airbrushing enamels, the proof will be in the pudding.
I got the wings on and positioned properly so I can begin to get rid of the seam there. I filled it with the same putty I used in my younger days, Testors. I’m reading about other ways to do this too: specialty putties, super glue, ‘gap filler’ products. I’ll probably try any number of things. I’ve got some decent sanding products to work on this too. Both high number sandpaper grits (up to 4000), and some sanding cloths in gradients. I’m also prepared to rescribe panel lines if needed. I’ll be using a pin vise for the first time. Reading, reading, reading about techniques. I’ll need to try applying them!
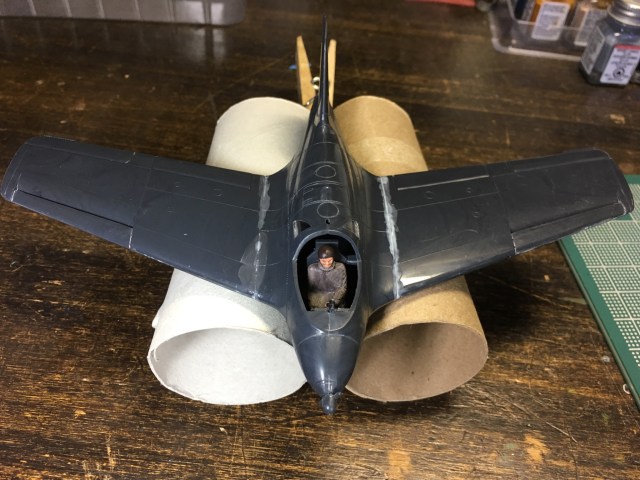 Made a jig to hold my airplane for painting and other work.
